

i grow organicly but i have used hydroponics in the past
Here's some info to read.


 ...HIGH...
As you can see this page is still under construction
in the next few weeks i'll be adding links to growing tips and a few of my own
so please return soon

Heres some GROW GUIDES to get you started
transplant shock can be avoided!!!!!! just water plants well, a while before transplanting ,
and use a weak seaweed based fertiliser to water them in Grow a *safe Crop in Your Closet by VuDu Furball
Material List
____________
1- 400w fixture & reflector
1- modular ballast for above
1- 110v computer-type fan
1- vaiable setting timer
1- outlet strip
3- 6-10ft extension cords
1- roll of Mylar
1- programmable Co2 egine
(optional but vive la differance!)
1- 9x13x3in. baking pan
2- 5 gal.restaurant pails
15- feet f 1/2in.surgical-type tube
1- combo tee&shut-off valve for above
1-pH test kit
1- pint Potassium Hydoxide
2-lbs. 10-20-10 hydroponic nutrient(part A & B)
1-lb 7-19-14 hydroponic bloom nutrient
1- pit micro-nutrients
2- syringes 1 small, 1 medium
1- ppm.(part-per-million)meter
2-dz Jiffy 7 plant strter pellet-pots
1-dz 10in dia- 10in.deep pots(straight-sided)
1-Petrie dish
24- The BEST seeds possble to obtain!
1- copy of this phile!
============================================================
Why would anyone want to grow pot in their closet?
My reasons are many. I do not believe, for one thing,
that the government has a right to abridge MY Constitutional right
to "The Pursuit of Happines". Though I love to smoke out,
I do not like to pay exorbitant prices to a system which at the top,
i its' worst form is responsible for crimes against the common man
ranging from, but not limited to, urder, white slavery and de-stablization
of legitimate governments. I'm talking about not suitcases,
but rather ROOMS full of 100 dollar bills.The Big Boys.
Well, having said that I should also tell you
that I have never sold so much as one Gram of my pot.
If YOU do, it will undoubtably lead through unortunate twistings
of Fate and coincidence to your getting busted.Kharma's like that.
Guard yours an keep it good! O.K. no more lectures...
Let's get on with it!
* * * * *
Takeabout 12 of THE BEST SEEDS available to you
and put them on a scrap of UNPATTERNED paper towel in th Petrie dish.
Put about 2 tablespoons of room temperature tap water
in the dish, replace the top and put the dish in a warm totally dark place
for 24-36 hrs. Remove dish after time is up from your darkspace
and place the dish in indirect light, still keeping the babies warm.
DO NOT allow the paper toel to dry out. Better too much
than too little water at this point,but make sure when you add the water
that the temperature doesn't shock the seeds.
When you notice the seeds have mostly germinated ad grown tails
about 1 to 1-1/2 inches, it is time to prepare the Jiffy-7 pots.
(You can use alternat methods here but throughout the process,
I have endeavored to produce OPTIMUM results. Any deviation from my method
is toying with LOWERING that standard. Too many substitutions
and you might end up gowing rope.Your choice.)
Soak the Jiffy pellets in pH balanced,(6.5pH),water
until they are fully epanded. Poke down 3/4in.
with a pencil and with tweezers, gently plant the seeds
with the point of the tail pointed down.
Leave the husk part of the seed just barely exposed.
place the seedling pots under an ordinary lightbulb
in a shallow pan of 1/2 strength nutrient mix, keep warm and moist.
In 3-5 das they should be about 1-2 inches above the level of the Jiffy Pot
and established well enough to suvive being put under the lights.
But we haven't got our grow-closet set up yet do we?
Not to worry, 'ere's how to set it up...
SETTING UP THE PHYSICAL PLANT
The closet that was the bst suited for my purposes
was 2-1/2 ft. deep by 6 long and 8 ft. high.
Line the walls with the Myla.NOT aluminum foil
as the inevitable crinkles will provide too many angles
and that may confuse yourplants.
Hang the fixture-reflector-bulb assembly exactly in the middle of the ceiling,
as close to the top as possible.The light won't be moving,
so you can fabricate fasteners out of 4 in. strips of cardboard
and staple the wires fast against the wall,preferably in a corner,
and run them out of the loset and to the ballast.
Assuming your door is in the middle of the closet, nail
1x1in.strips 18 iches apart up the walls on both sides of the door
and do the same thing on the back wall.
Cut shelve corresponding to the depth of the closet.
Now,when you lay a 6"x1"x66" board on two shelves of the ame height
you will have a plant shelf upon which to put your plants.
I place one long plant board in. from the back wall and 24in. under the light.
The second goes about 42" from the light. Countingthe floor as a level,
this provides me with 3 levels, the lowest(floor) in front...
The mid-height in he middle and for the shortest plants,
the rear level is closest to the light.
This obviates the nee to put the light on a pulley system
which doesn't adress the height-variation problem anyway.
On the far left(or right) of the mid shelf
place the baking pan and place the fan behind it on a piece
of vibration absorbing material such as 1/2in. foamrubber.
Point it ever so slightly upwards. By careful placement of the shelf itself,
you can leave a 3in.gap between its edge and the left wall.
This proides somewhat of an induction effect on yhe cool air underneath
and this is exactly what you want. Sretch a thin wire 18in. above the pan
and drape 1 in. strips of old t-shirt mat'l, long enough
that the ends rest on the bottom of the pan.
Fill the pan with water and when the water wicks up the clothstrips,
it will be evaporated by the heat of the light and the fan will distribute
it naturally arond your plants. This is your humidifier
and if you leave this out your plants will die faster than yu ever thought
possible. The fan wires go to the timer so it is always on when the light is.
On eiter side of your reflector, repeat the shelf step
so as to mount a shelf for 1-5 gal plastic restaurat bucket.
Cut the tubing into 3 pieces: 2@ 3 ft. and 1 at 10 ft.
The tee/shut-off goes at the junctin of the 'Y'
this will make and this is your manual feeder for the nutrient solution
which you will ix 10 gal. at a time.You should have a bucket for nutrient
on each side of your lamp and reflector asembly.
The tubing should be configured so as to resemble a giant stethescope
with the long leg reacing the floor level.
Connect your outlet strip to the output side of the timer,
plug the fan and balast a.c. input and ground.
I cannot overemphasize the importence of FUSING and GROUNDING all circuits
properly.
It is of the utmost importence that the ballast be outside the closet
because the tremndous amount of heat produced by the device.
In an enclosed area that would be deadly to your plantsat best,
a fire hazard at worst.O.K.? Then we shall procede!
I am recommending a 400 watt system ecause 1000 watts
will tip off the electric co and then they'll probably pick that up to you-know-wh.
The 1000 watts performance is much
better but in a closet the lumen yield amounts to overkill.
Mot periodicity charts indicate
the point of diminishing returns for cannabis indica and cannabis satva
to be at about 17.5 hrs. I have always pushed that envelope to about 19.5 hrs
with excellent reslts.
This is the amount of time you should set on your timer
for the growth stage. When the time comes to bud your crop,
you will reduce this to 12 hrs until the sexes "show themselves",
the female bud develop and set and then you can inchup the photoperiod a bit
when you get into mass resin productin. But more about that later.
Well,it looks like the closet is about ready to go,
so let's move righ along onto the next part.
THE PROPER DIET IS EVERYTHING,(almost).
Everything, if you don't cout genetics, type and amount of light,
medium characteristics,transpiration rate,
apmospheric composiion,pH balance and pest control!
Just like any recipe, when you get these ingredients together
in th right proportions, the result can be mouthwatering!
Speaking of water, you should make your waterup
10 gal. at a time. Use the mixture listed above,
available at any Hydroponic shop. under the nameGolden Grow
or any similar variation thereof. The Micro Nutrients are, of course,
essential. Without them the plant can utilize very little of what you
are feeding her. Weigh your ingredients or measur VERY carefully
because you absolutely MUST maintain a level
of 1000 to 1200 ppm of disolved salts.
f you take a small sample into the hydroponic shop
where you purchased your supplys they should be glad to give you a reading.
If you are good with a hydrometer,
there is a method of deriving ppm from secific gravity
but whatever method you choose, you must get a handle on it
or you're back to farming rope again.
the order of preference foe source water goes
1.Distilled,
2.Rainwater,
3.Tap water.
Whihever you choose,
balance the pH with Potassium Hydroxide to 6.4 to 6.6.
Do not allow your solution t wander out of this range.
The nutrients will throw it over to the acid side of the scale
when you ad them but your readings and corrections for pH are done beforehand
so don't worry about that
.Just ake sure the water you start with is in range.
Feed your plants every day and give them a good soakig
unless you notice that the soil is still damp from the previous day.
If you have provided proper drainage (rocks in bottom of pots)
, about 20% of each feeding should run out the bottom
to some sort f catchbasin or tray under the pots.If this isn't done,
poisons will build in your soil and kill you plants.
A good medium is made from 3/4 potting soil and 1/4 sand.
Add a handful uf vermiculite (unued catlitter) per gal. of soil mix.
I do not leaf feed because in this dynamic an environment
,solutios evaporating off the leaf before they are absorbed
can leave an acid residue causing burning and clgging of pores,
the leaf needs for transpiration of fluids.This is a high temperature environment
so beware of doing things you might consider doing to a houseplant.
TRANSPLANTING WITHOUT FEAR
Death by transplant shock is a function of ignorance.
There is no other reason for it.Just follow the drections
and you will lose not one plant!
I promise.
The little leaves you first see when the seed usk falls away is called the cotyledon
set. When you see the second set of serrated leaves
just begining to form, it's time to transplant. Put a layer of rock
on the bottom of a pot with a drainage hoe in it. Put 2-3 in of soil on the rocks.
CAREFULLY remove net from Jiffy 7 unless root is poking though.
If that is the case just loosen the net as much as possible without disturbing the root.
Set po on the dirt so the cotyleden leaves are about 1-1/2 inches
below the plane of the top of the plasti pot.Shielding the Jiffy
and plant with your hand, carefully add dirt,filling the pot in rotation arund the pot
to a level of 1/2 in from top.Cover with 1/2 inch of decorative white fishtank gravel fo reflection
and it makes watering damage non-existant.
Put the plant on the shelf that is 24-36 inchs from top of plant to bottom of bulb.
When top reaches 24inches or starts 'brown curling', it's tim to move it to the next level.
A NOTE ON TRIMMING
If you overtrim your plants they will pobably all turn 'male'
at sex-determination time.
Since the object of this little exercise is to prouce female buds,
dont do it!
This is what I do.
The first month, I try to pinch the main stem onceto produce two main stems.
I allow one leaf set between pinches and some plants get the treatment agin,
producing 4 main stems.
The next 6-8 weeks, I trim large 'suckers'
and side trim about everyothr limb-start-underleaf,
traveling around the plant in corkscrew fashion.Shade leafs are a big targetfor me also.
Look down on the plant for a bulbs-eye view of what constitutes a shade leaf.
Don't getcarried away. Get any yellowing or wimpy inside losers.
You'll know them when you see them.
By now he pot is REALLY getting good to smoke
so the tendency is to rationalize a reason to pick, pick, pic
when you run out of stash. To avoid turning all your plants male,
designate a 'smoker" and trim thehell outa that one if you must.
When it goes male, KILL IT QUICK and any other males that happen too
Otherwise it will fertilize your females and when a plant starts seed production,
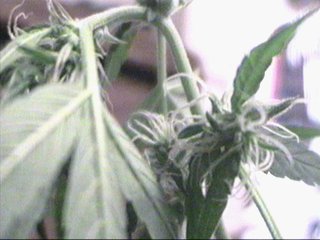
it stops all resinproduction. Resins containing Tetrahydrocannibinol is what we are after,
so don't dally when it come to killing off the males! Us and King Herod, eh?
For at least two weeks before entering the Bud Rutine,
just pamper your girls and don't even pull off the yellow leaves.
The girls are about 12-16 weks old now and depending on their specific strain
and to a large degree, how well you've done YOUR ob, they should just about be ready to bud.
CHANGING SEASONS
First step in convincing the girls fall has come
at last is to reduce the photoperiod to under 12 hrs.If you were using a mercury bub,
changing to a coated sodium bulb will further the deception by adding more red
to the spectrum jut as the sun does as it plays lower on the horizon.
As well, the nutrient must undergo a little tweking.
You should go to a 7-19-14 mixture and reduce the micro nutrients by 25%.
The amount of the daly feedings will drop dramaticly and you must guard against overwatering.
Do not stress the plants b witholding water however or maledom may rear its ugly head.
When buds set, kill males. Only removethoroughly yellowed leaves.
After buds establish and reach maturity, start diluting nutrient,
cut ff humidity system and increase photoperiod gradually to no more that 15 hrs.
If you have been utiliing cO2 richment, cease that also.
Stress plants by under watering. Some people take sissors and slie up leaves to bleed them.
I, Myself have split the stems between growth nodes low on the plant,
therby fooling it into producing extra resin. Resin is the plants defense mechanism
and all sorts of thigs stimulate production. Mostly things to do with heat and injury.
FINISHING UP
This is how Icure my produce.
I pull the plants after withholding water
(and the last weeks feedings are just tht...un pH'd un treated tapwater
but very little of that!) I place wet papertowels around the rootbal
and encase the ball in a baggie, sealed around the stem with a twist-tie.
I hang the plants upside own by the furnace in the basement
and spread newspaper underneath to catch the fallout. Slo-cure is best
but there are as many methods of drying pot as there are of growing it.
Freezing pot will presere it the longest.
Just take normal freezer precautions and it'll maintain its THC forever.
Not so ina drawer someplace.
Give away as much as you want to your friends but NEVER admit you grew it.Say friend they don't know grew it. No harm there and it may insure you're around for the next crop. I' not saying your friends mean you harm but once you lose control of that information,ANYTHING can hapen.Murphys
Law applies.Also, Loose Lips Sink Ships! Whatever you do, do NOT sell even so much as abowlful of your Artwork... You'll
be glad you didn't.
Well Buddy, I'm the VuDu Furball,
and I say i's time for another Bonghit!
I dunno if I agree with all that but,( apart from the bong hit )...it's a start
